 en
en
Body preparation and exterior trim repainting (part 2)
by Peter Gumbrell, 2002-07-15
This second instalment of a two-part tutorial details the final preparations made for repainting an R4, in addition to the respray itself. The procedures carried out here were performed whilst learning about body repairs on a vehicle restoration course, and the many photos show the Renault 4 that I owned at the time. To read part 1, click here.
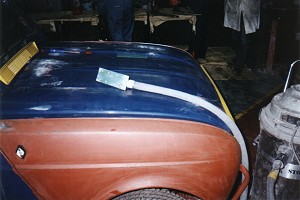
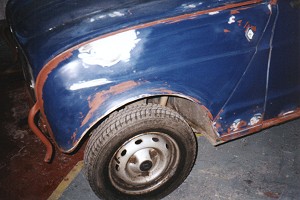
Moving on now to December 2001, and during some typical English autumnal weather, my R4 had been left half-finished since the trip to Arnhem in September. It would have to remain so until the spring when the weather improved, or so I thought. The photo below shows that dastardly dent again on the front wing, caused by the dispassionate Salford City Council workman earlier in the year. This was going to require knocking out and filling before any repainting could be done, and there were a couple of other areas below this that needed perfecting, one on the groove which runs along the wing panel, and also the entire rim of the wheel arch underneath, which was uneven with cracked and flaked paintwork.
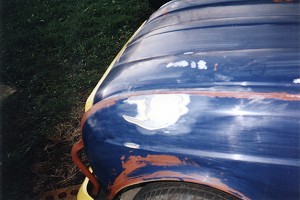
These first two photos in fact show the dent at a later stage during the final body preparation work. You can see how the paint had been rubbed down to the bare metal around the edges, then partly built up with a first layer of filler. Clearly, this doesn't cover the whole of the affected area, but that wasn't necessary with the first attempt. A rubber hammer and sucker had been used to shape the dent closer to the original mould of the panel, but due to the difficulty in reaching the rear of the panel without removing it, and the possibility of further damaging or ripping the bodywork, it was left still a fair way short of perfection. Again, had there been time to give the car a complete and proper restoration, this would have been made as precise as possible, or more likely the entire panel would have been replaced, but I had no resources for doing that, besides which the rest of the panel was still fairly new and in good condition. With any reasonably sized dent or hole, you can't expect to fill it perfectly in one attempt, and it is often best to get the major part done with the first layer, then smooth out and perfect it with one or two additional layers, using finer grades of paper as you go.
When smoothing out the hardened filler on flat body panels, you really need to use a sanding block of some sort, not just paper on its own, as the flat block will ensure you contour the fill with the surrounding area. Although sometimes regarded as unsuitable, a block can also be used on curved surfaces, provided you are aware that the direction in which you rub can make a difference to the finish. For example, with the dent shown above, most (though not necessarily all) of the smoothing down should be done in a vertical direction, going up and over the curve at the top of the panel, rather than going horizontally along it. Realistically, in most cases a bit of both is required, else you risk causing a ripple (ridge) or trough (valley) in the finish, but in this case the former method would be given a bit more importance. If this seems somewhat strange, consider the surface of the sanding block making contact with the panel in the above pictures. Admittedly, it's difficult to tell by these images, but hopefully if you're familiar with the shape of the Renault 4 you'll know what this area looks like. When rubbing horizontally, only a thin part of the block and panel will make contact because of the curve rolling off either side. You'd have to be an expert to maintain a perfect finish this way, constantly moving the rubbing line a little higher or lower until you've worked from top to bottom of the panel (or vice versa). It is more than likely that upon feeling the panel with your fingers in a vertical direction afterwards, there will be the odd ridge or valley, caused where you rubbed a particular point slightly softer or harder, respectively. When rubbing vertically, however, the whole of the width of the block will be making contact with the panel at all times, which will ensure you get a more even finish. Remember this principle when working on other curved body panels, as it is quicker and more effective to use a sanding block where possible.
I'm now going to launch into another short rant about how my rear wing was ruined, so skip this bit if you prefer. I can't seem to get through an article like this without having some gripe.
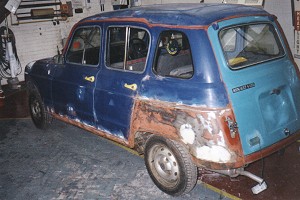
A further dent to one of the wings (seen below) occurred in November 2001, following an incident in which an utter moron displayed probably the worst example of driving maneouvres I have witnessed. I was parked in the car park of the college where I was studying vehicle restoration, and was sat in the car having my lunch. A student made his way back to his car which was parked alongside mine, and I got a sense that something might happen after he seemed completely ignorant of my car being there at all. He rubbed his rucksack, which was on his back, all up against the side of my car, and knocked my near side wing mirror out of line as he clumsily got into his car. Then he began reversing out of his space, with a good eighteen inches' or more gap between his car and mine, but as soon as he began reversing he was also turning the steering wheel to an acute angle, and he absolutely walloped the back wing of my car, then scraped the front quarter of his car along my panel, almost ripping the back bumper off. My car shuddered and rocked to and fro violently. I just could not believe it, I don't know what on Earth he thought he was doing.
More unbelievable, however, was his reaction. I got out and surveyed the damage, then approached him as he was about to drive off in a rush. He casually said 'sorry', and attempted to drive away again. The damage was quite major and would require much money and work to put right, so I told him so and asked him for his details. At this he seemed startled, and said 'What you mean you've got insurance?' He got out and had a look at my car, saying the whole car was only worth fifty quid in his godly opinion, and offered to take me down to some mate he apparently knew who would get it seen to. He refused to give me any of his details, and I certainly wasn't going to following him to some dodgy mechanic friend, assuming he didn't speed off along the way. I took his number plate and vehicle model, and he called over his stocky mate, who was about six and a half feet tall, and whom pronounced my car not worthy of the repair, in his Mister Know-all intelligent opinion, but it was obvious he was trying to intimidate me. During all this, I had noticed that three rather important looking people in suits had been stood right by as the incident happened, so I caught up with them in the college canteen. As luck would have it, they were the Principal and Vice Principal of the college, along with the Head of Site. Unfortunately, despite their proximity of about one metre to the incident, and the extremely loud noise made during the impact of the vehicles during which mine rocked back and forth like a funfair pirate ship, they claimed to have not noticed, bar the Vice Principal who apparently 'might have heard something'. They were happily indulging in their corporate lunch until I arrived in my scruffy overalls, and clearly the thought of them having to actually help one of their college's students, rather than consume their next dumpling and discuss share options, was beyond them. The Head of Site did, however, offer a few minutes of his time for which I was grateful.
So, I was all set the following day to pursue legal action against the other driver. I had contacted the police, but they could do nothing as the incident did not occur on a public road. I was also unable to claim directly on my insurance because I only had third party fire and theft cover; it was only the legal protection included that offered me a route to pursuing the claim. However, I was then persuaded otherwise by the Head of Site, who suggested I get the vehicle restoration department of the college to repair the damage instead. They would see if they could trace the other driver and recover some costs from him. Anyway, if you want to know how all this turned somewhat sour, you can read about it on the My Pics page of the Gallery (number MP14). I won't go over it all again here, suffice to say, that's how the situation developed whereby the paint tutor at my college offered to repair and respray the car for me.
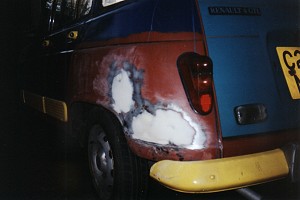
So, it was shortly after New Year 2002 that the R4 was taken to the college for final preparations and a full respray. The picture above shows the second area of damage, on the near side rear quarter panel. In fact, what you see is a semi-repaired panel, not the original dent, which was quite hideous. It had seemed unrecoverable and more advisable to fit a replacement panel due to the scale and severity of the damage, but credit where it's due, the paint tutor knocked the panel back into shape surprisingly well, and only thin layers of filler were eventually required to bring it back up to scratch. In case you haven't already read it, the previous article in this section details the basic procedures for flatting down and filling rust patches and dents.
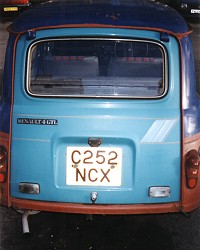
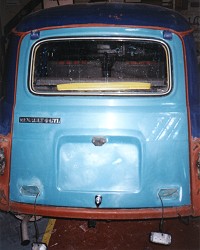
The only point of this photograph above is that it shows the original decals on the back door, which I have not found on any other R4. It was basically just two parallel, horizontal strips, accompanied by the two thick diagonal stripes seen on the right-hand side. These would have to be removed for respraying, so I set about taking them off with a scraper, then wet-flatting the whole door using a medium-fine grade of wet and dry paper. You can see the result a few photos later on.
You may recall that I had coated all the several patches of filler that had previously been attended to, using some red lead oxide paint. This was a short-term measure to protect against rot, knowing the car would probably be standing over winter before being fully repainted. Well, clearly all of these patches were not flat enough, and some were decidedly lumpy, so I needed to go over them all again with a medium grade paper (P400). In the above picture, you can see the extractor machine which I mentioned in the previous instalment of this article, to which is fitted a special sanding block. You also require specially manufactured strips of paper to fit onto these blocks. The dust is sucked through holes in the block into the extractor, making the job not only easier with less to blow off afterwards, but much safer due to less chance of inhaling potentially harmful particles, or getting it on your skin. This is a very useful tool for anybody who does frequent body repairs. For those of you who don't have such wonders, it is important to remove the dust in other ways. If possible, a blower connected to an air line is preferable, but again will be beyond the reach of the average garage enthusiast, so a soft brush may be a good bet, providing it doesn't scratch the bodywork. Before the final respray, the car will need degreasing, which will remove any last traces of dust, as explained later.
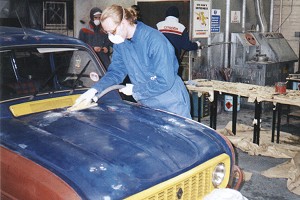
Just to prove that I really did most of the work, here's a picture of me getting to grips with the flatting. I wet-flatted the whole car one more time with a medium-fine grade paper (between P600 and P800). You will see that I am all kitted out in safety gear - in fact how many items can you spot? There's the goggles, the dust mask, the latex gloves and the overalls, plus the extractor machine itself. And although I didn't bother on this occasion, don't forget that if working in a noisy environment it's well worth using some earplugs, providing they don't stop you hearing anything important like fire alarms, obviously.
Once more, all the yellow trim was removed, that is the front grille, the air intake below the windscreen, the plastic side panels, front and rear bumpers, and above you'll notice the number plate has been taken off too. Most details concerning removal are in the previous article, however, a note here about the side panels: Renault 4 GTL models, which have these large plastic versions, can be a bit tricky. There are a couple of round plugs at the base of each panel, which must be taken out using a thin, flat screwdriver. With any luck, behind these you will see the screws, but sometimes they can be misaligned, making the job near impossible. If you only see grey plastic, try shifting this to the left or right with your fingers, as there are some movable parts which slide across. The original screws have small rippled washers, and they fit into square-fronted plastic plugs which slide into the actual holes in the body panels. These plugs can be left on the car if required, though they may fall out, and it is common for them to be either worn, damaged or missing altogether. Replacements are hard to find so look after them. The side panels can then be slid upwards (perhaps with some force) to free them from the many nails which are fitted onto the body panels. It is quite likely that you will find rusty areas behind these panels, as dirt and salts are trapped and gather inside, eating away at the bodywork. You might also find plenty of cobwebs and insects, most long deceased, but which will provide good reason to wash the panels thoroughly before refitting. The front and rear bumpers can also be a real pain to remove if the nuts and bolts have rusted, but they are otherwise a straightforward task that require no further explanation here. The only awkward bits are the bolts around the two 'lug-handles' between the front wings and the bonnet (as seen below), though not all Renault 4s are fitted with these.
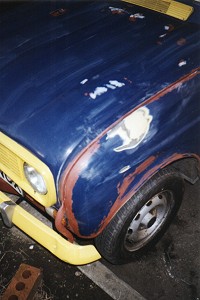
Although difficult to see here, the dent on the front wing has now been filled with a second layer of filler. The bits underneath, including the rim of the wheel arch, have also been attended to. There are still some patches of bare metal around that dent, though, which is not ideal. This means the repair is not completely smooth, and indeed after the respray this was one of the only areas where I could just feel a slight valley, despite it being invisible. Again, time dictated that we must press on rather than spend another hour with another layer of filler, but at the very least, the bare metal should really have been covered with some primer. The salvation was that a layer of primer was eventually applied to the whole car during the respray.
Here again is the old turquoise door that I was rather fond of, but now you can see that it has been fully flatted down, with the stickers removed. The number plate has been removed, though I should also have taken off the light above it, and the reversing lights can be seen hanging down on their cords. As with many of the other light fitments, removal is straightforward, and you can detach these lights easily as they clip off from the wires. The front side lights are similar, though each of the three wires can be removed separately. The headlights can be easily masked up and do not require removal, whilst with the diamond quarter indicator lights you can remove the screws and pull them out somewhat, then mask up the bits that stick out. These lights are generally only found on UK models from around 1985 and 1986, because new regulations brought into force meant that vehicles had to have wing indicators. I've noticed many other variations, however, with other countries having round or square lights in similar locations.
The rear lights are simple to take off; just a couple of screws on the outer casing, a couple of nuts on the metal part underneath, then the wires can be unclipped and masked up. Once the car has been wet-flatted for the final time, it should be allowed to dry and then fully degreased. It is possible to make up your own degreasing solution, but it would be simpler and perhaps more reliable to just buy some ready made from any automotive stockist. Degreasing is essential to remove all last traces of dirt and grime, even if none is visible. In the picture above, you can see the car is still covered in filler dust, and it will also be covered in dried out, dirty water from the flatting. All this should be removed to ensure the best adhesion for the paint. You will need some paper towels or tissues to degrease the car, and to do the job properly you must use both hands and be quick in your action. Alternatively, find somebody to help you but they must also be quick. The basic principle is this: dab some degreasing solution onto one tissue, and rub firmly and briskly over the bodywork. You will notice the fluid leaves smears which dry out within seconds. With the other hand, or the second person, you must attempt to wipe the wet areas with the dry tissue, before they dry out. With the right amount of degreasing solution, you should have about 5 seconds before the liquid evaporates, so if it is disappearing almost immediately, use a little more fluid. Ideally, you should go over the whole car two or three times in this manner, because the slightest bit of dust or grease will make a big difference to the finish, perhaps not immediately, but certainly over the long term.
Above, you can see the difference from the previous picture once the degreasing is complete. The dust is banished for good. Now, onto the masking up. There is a bit of an art to doing this, and unfortunately it's not something that can be explained easily in print. Much of the skill lies in the thumbs, in guiding the masking tape around the awkward curves. It should be mentioned here that once again, because of time constrictions and budgets, my car was not given a full respray, which would include the inside and under the bonnet, etc., nor was it given a proper respray that would have involved removing the doors, so my own paint job was purely an exterior one. If you were doing the whole thing, there would of course be mountains of parts to remove and mask up, especially under the bonnet, plus interior furnishings to remove and, quite frankly, a complete strip down of the car. If you are removing the doors, you should acquire a roll of wide masking paper, which can be cut to size and taped to the insides of the doors around the frames. Always leave the driver's door until last, so you can maneouvre the car if necessary. If you are not removing the doors you should still acquire some masking paper, though you may get away with a smaller size or a pack of sheets rather than a roll, considering the relatively miniature windows of the R4. Note that proper masking paper should be attached the correct way around; both sides are not identical. One has a more shiny coating, which should be placed facing outwards, in order to repel moisture and stop paint seeping through to the other side. You can always use newspaper as a substitute for masking paper, especially if you are not doing an expensive full restoration, and if, as in my case, you are keeping the doors and bonnet on, you should use some strips of foam to sandwich in the cracks around the doors, to stop paint going through into the car. Prepared strips with sticky adhesive can be purchased from specialist suppliers and trim manufacturers.
Masking is quite straightforward, but when fiddling with the curves around window frames, use one thumb to hold down the tape, the other one to guide it around, sliding the first thumb along behind. I can't really say any more than that, it's just trial and error. It is possible, however, with practice, to achieve perfection in this, as was the case with myself and the others who masked up my car. You really can curve the tape around the windscreen to the last millimetre, giving the impression once sprayed that there was never any other colour underneath, although this may in part depend upon using the right type and level of paint that will not soak through the tape.
Clearly, when respraying a car you should choose a good location, preferably a garage or proper spraying booth, but without doubt an undercover location unless unavoidable. Also, ensure your car is well away from other vehicles and objects, as small particles of paint can travel a long way even in the faintest wind or draught. If you have to do it outside, try and wait for a very still, dry day, and wherever you are parked, try to prevent anything including dust, insects, rain or other people from touching or landing on the surface. My own car was sprayed in a professional spray booth, then baked to make the paint set faster and give a longer-lasting finish. This would normally be expensive, however, and only really worthwhile if you are doing a major restoration with perfection as the aim (which I wasn't). If you are spraying indoors, ideally you need an air-fed mask attached to an air line or cylinder, but at the very least use a decent face mask and goggles, and a cap of some sort. If you don't have an extractor, ensure there is some ventilation but not anything that will cause a draught. It is also a wise precaution to advise somebody what you are doing, so as they might rescue you should you suffocate or have a breathing problem.
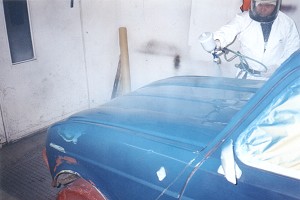
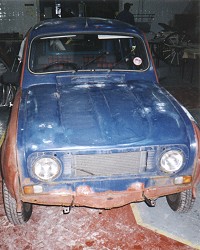
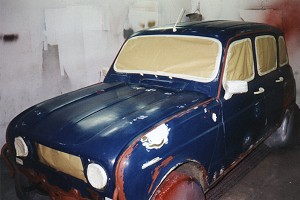
If you have any areas of bare metal, or you have stripped the entire car of paint, you need to apply some kind of primer, and special etch primer is particularly good. This has adhesive qualities that allow overcoats to grip more firmly and provide a smoother finish. You can also use standard primers, which usually come in red or grey, including good old red oxide as mentioned in part 1 of this article. Other colours are available from specialist suppliers, and you should be aware that the shade of the undercoat can make a difference to the overall colour. In my own case, I had a layer of rather special aqua blue primer, as seen being applied in the photo above, which was ideal for the deeper mid blue overcoat, and I'm sure it made a noticeable difference to the final result. The deeper blue paint had a slightly purplish tinge to it, and I reckon this was visible initially for at least the first day or so, but as the paint settled it became a more definite blue, so it seems that the undercoat must have been showing through more.
If you can use a proper air compressor and paint gun, then all the better, as it can make a big difference to the finish. When using a gun, clean it out prior to adding the paint by spraying thinners through it, and spray the first paint on a test surface until the paint is coming through clearly and evenly. When using an aerosol and spraying over the top of existing paint, ensure that you have the right type of paint. Most are cellulose based, but if you attempt to spray this over a synthetic finish it will crinkle. It is very probable that your car has cellulose based paint for its previous or original finish, but if in doubt, or you suspect your car was repainted before, try and find out what paint was used, and test the new paint on an area that will not show (such as under the bonnet) before going ahead with the rest of the car.

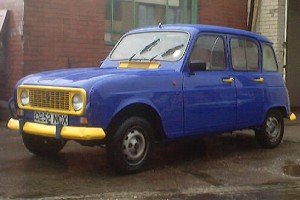
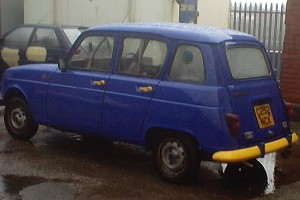
There's obviously a bit of a leap between the last two photos; and as if by magic, the resprayed car appeared! This was due to my old, unpredictable camera misleading me as to how many pictures remained on the film. I would have liked a couple more before the car came out of the booth but had to wait until returning home and inserting a new film, by which time it was dark. These last three pictures were taken by my friend Maria Cooke, a week after the respray.
If you are spraying a layer of primer or undercoat, this is a good time to practise your technique. Although you would not wish to ruin even the undercoat for fear of it showing through the top coat, it is a good opportunity to get to grips with the spraying and to master the action before you apply the final finish. The paint tutor at my college actually sprayed my car, not myself, but I know how tricky it can be to get it just right, having practised on other vehicles. Unless you are using a specially adapted spray gun and compressor, which allows you to use the vessel upside down, you should hold the aerosol or gun upright (or as close to upright as possible when treating flat surfaces such as the bonnet), and hold it around 10in / 25cm from the surface to be sprayed.
When you begin spraying, start off on a masked area, or in the air slightly away from the car, so that as you sweep your hand across there will be an even spread of paint onto the surface to be covered. Also ensure that at the end of each sweep you drag the spray away slightly or onto the masked area, again to ensure even coverage around the edges. You need to be quite confident in your approach, generously spraying the paint as opposed to nervously spraying short blasts in different places. However, the right balance has to be achieved, and too much paint will cause it to run or sag, so don't go over the top. If anything, under-spraying is slightly preferable to over-spraying, as although you will not achieve such a quality finish, it will at least save you having to wet flat the whole thing down and spray it again, which is what will be required should you experience any sagging. Do not get this logic confused with the distance at which you spray; it is a different principle. Under-spraying is the result of moving the spray can too quickly or erratically across the surface, or striping the area by allowing too much gap between each line of spray. If you spray from too far away, however, another undesirable effect can be achieved because small particles of paint dry up before they hit the surface and create a speckled finish.
The most important thing about the whole spraying technique is the action of your hands and wrists, and the angle at which you spray. It is very important to practise on a rough surface before you do any spraying for the first time, because there is a bit of a knack to be discovered in how you apply the paint. Above all else, you should always move your hand along the line of spray so that the paint fires perpendicular (at 90 degrees) to the area being covered. Do not turn the aerosol or gun at an angle to the bodywork, instead keep your wrists flexible so your spraying action is always in the same direction. The exception is with awkward surfaces such as the roof, where you will still need to keep the can fairly upright but pointed somewhat downwards to accommodate. The only time the can or gun should be rotated sideways from its vertical position is when following certain curves (such as the top front corner of the passenger doors), in which case you can turn the can or gun slightly as you follow the curve around (only by about 25 degrees maximum). You should still, however, keep the angle at which the spray hits the bodywork to 90 degrees. Of course, there are some areas, such as the rims of the wheel arches, which require a little more adjustment and it will not be possible or feasible to hold the can completely straight on these sections, but these are the exception.
As you work on each section of the car, for instance a side door panel, move along in a straight, horizontal line until you pass beyond the edge of each area and onto the masking paper or into the air. You can then release the spray, and adjust your position down slightly, moving back along in the opposite direction at a slightly lower point. You should always overlap the previous line by a good inch or more, so as to avoid striping the panel with sprayed and unsprayed lines. Ensure you obtain enough paint for the job in the first instance, and be prepared to give generous coverage of the vehicle, possibly even a second top coat, if you want to obtain a decent finish. As a warning, take the example of my sister, who knew for sure that she would require about six tins of paint to cover her Renault 4, but was persuaded otherwise by lousy shop staff that a small car like hers would only require two. She took two, soon realised she definitely would require more, but the shop sold out of the same paint, forever fobbing her off with excuses as to why more stock had not arrived, and totally let her down. In the end, my sister was lucky enough to spot the same, rather rare paint elsewhere, but only several weeks later which caused an awkward delay. The original shop, by the way, was Cliffords of Brighton, so don't get your paint there.
Finally, it is very easy to assume that areas around the edges of panels and narrow strips of bodywork will not require as much paint as elsewhere, but almost the opposite is true. For example, consider the edges of the doors on a Renault 4 (whether you are removing them or leaving them on the car). You will find that one quick spray up and down edges like these will not be enough, and they will need a good two or three sprays before the old surface is completely hidden. The same applies to gaps and recessed areas, such as between the doors or the sides of the bonnet (if you are leaving these on the car). Again, they need going over at least as thoroughly as all the other bodywork, else you risk having lighter or darker patches from the undercoat showing through, all around these edge points.
As I mentioned before, my car was then baked in a proper booth, which is something you may wish to investigate if you are doing a major restoration and respray. Once all the masking paper and tape was removed, the car looked an absolute gem, even in the dimly lit car park of the college at night. The following day, I took a couple of pictures before the bumpers were put back on the car. These can be found in the My Pics page of the Gallery (number MP15). I decided to give the bumpers one further coat following the aforementioned incident in which the rear one was scratched. I also used a tin of smooth finish blue Hammerite to paint the inside faces of the bumpers for a little extra protection against rot. This same blue was used to touch up the four rubber mountings seen on both the front and rear bumpers, which had been forgotten about. This blue wasn't a perfect match but was good enough and certainly better than the tatty silver they were previously. You will note that the last few photos, above, show the car missing the side panels, which were refitted a little later. I toyed with the idea of leaving them off for a while, as I rather preferred the look, a little more like the old-style Renault 4s, but now that they're back on they highlight the contrasting blue and yellow even further and once more return the fun look of the car, which is something I've always enjoyed.
I'm sure I've missed a few details which ought to be mentioned. (Obviously, allow good time for the paint to dry before driving off!) Respraying is a great way to get more from your Four but do bear in mind that, particularly in wetter countries, the car is very prone to rot and unless you have completed a full restoration and are able to keep the vehicle garaged, the investment made in repainting may not be long lasting. Unfortunately, this is true of my own car, which only six months on is already showing some rust problems in the usual areas. If you can live with the odd dent and minor rust problems, your annual R4 budget may be better spent on maintaining the chassis / underside, and the mechanics / engine compartment, both of which require constant attention to remain in tip-top condition. Don't forget to keep washing and waxing the car. It can make a big difference in the long term to its condition. Consider also obtaining some waxoyl and seeking advice on its usage, spraying any areas of the car which require it in order to protect against the inevitable corrosion.
Many photos of this second of my Renault 4s can be found on page 2 of My Pics in the Gallery.
 home |
 articles |