 en
en
Reflexia's rust repairs
by Peter Gumbrell, 2008-10-28
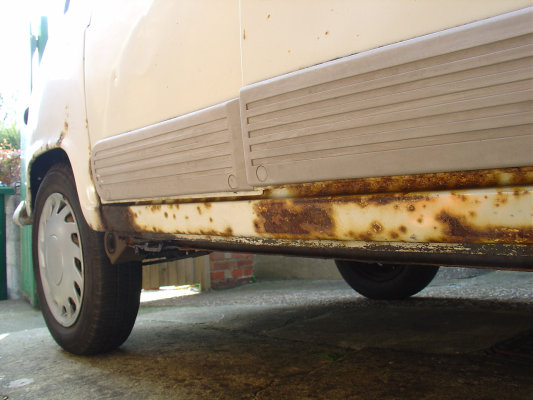
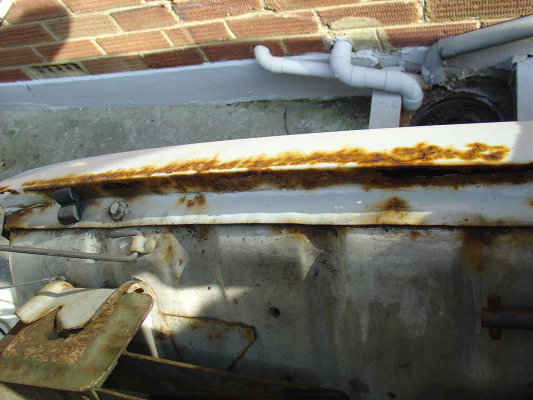
Further repair work was required for Reflexia's summer 2008 MOT, so I took the car to Derek Flavell's Renospeed garage in Lewisham, London. Although not MOT failures in themselves, I asked for considerable welding work to be performed to the rear boot floor corners. Horrid holes had been growing in these areas - a common complaint for R4 owners - to such an extent that splits were developing along the car and threatening to break it in two if action wasn't taken soon. At long last, the rotten area below the rear off side quarter window was also due for a makeover, and in fact this entire side of the car was set to be transformed over the course of the year. The image above was taken in the autumn, before I set to work myself on extensive repairs to the off side outer sill area.
Amongst other jobs, Derek fitted new rear wheel bearings, and he also sold me a new front off side wing to replace the badly rusted one seen below. This rot was beyond reasonable repair, and with front outer wings still being relatively easy and cheap to source, a straight replacement was going to be the best option. Again, this was not an MOT failure but the level of damage was soon going to cause greater problems to the inner wing underneath, and the large cracks along the rusty area were likely to lengthen quickly.
I'd had troubles with a flat tyre shortly before the MOT, and was unable to budge the nuts on the affected wheel using the crank from under the bonnet, so in not being able to fit the spare wheel I had to call a mobile tyre guy who replaced both tyres on the rear of the car (the other was likely to fail the MOT due to little tread). However, one of these replacement tyres was already flat the very next day, prompting me to have emergency sealant applied at a garage who charged me a fiver for the minute or two of work that was needed.
A few weeks later, both the rear tyres were again playing up with fairly fast punctures, so this time I took the car down to Brighton Tyres, whereupon a friendly and genuine man pointed out the problem. The previous repair had used dry sealant, which doesn't last long, so they instead used wet sealant to treat four of my tyres (by this time I'd developed further punctures and was beginning to suspect that somebody had it in for me). I did in fact enquire about having tubes put into the tyres, since I was becoming sick of all the problems and believed it might offer a better alternative, given that the wheels were old and rusty and possibly prone to cracks and air leakage. I was advised that this procedure was now not performed by most garages because inner tubes deflate immediately, increasing the risk of accidents, as opposed to punctures on tubeless tyres which take longer to go down. Various punctures were also fixed on the tyres, and no more problems have arisen since then. Indeed, the man confirmed my suspicion that the mobile dealer was a known cowboy whose tyres always go flat.
So, following some additional minor costs such as a fix to an electrical problem during the car's MOT retest, a replacement Euro-style number plate for the one cracked at the front some months earlier, and a new distributor cap and rotor arm, 2008 was going to see considerable further investment in the car as I set to work with a bunch of new tools and equipment, one item of which was an angle grinder.
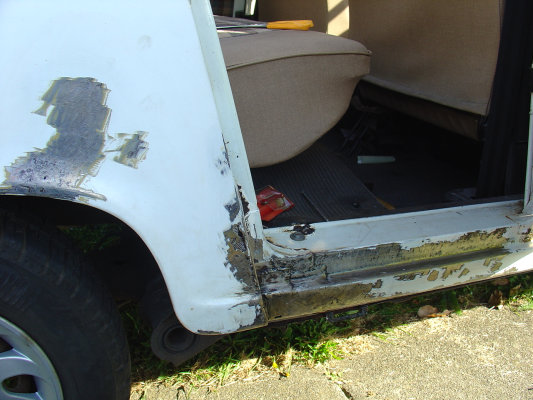
I'd never used an angle grinder before, and am not particularly keen on doing such work. I'm the sort of person who is better suited to working on a computer and paying somebody else to do all the manual labour. It's just not my realm nor my desire to sweat over such things. Nevertheless, I was all kitted out in overalls, goggles, ear plugs, dust mask and gloves, grinding back all the rusty paintwork to the bare metal underneath. The sill section on the driver side was my main concern, though a few patches on the lower rear wing and the A-frame section behind the front wheel also needed some attention.
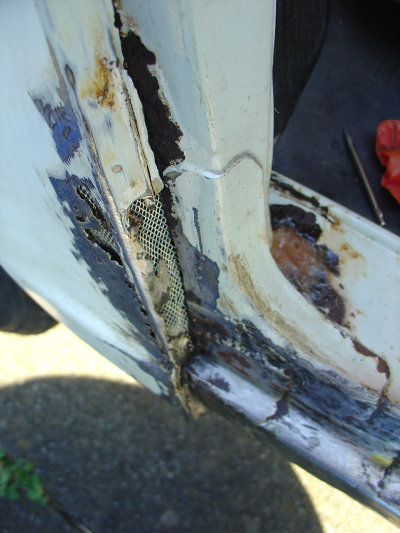
The picture above demonstrates the scale of the task I was facing in the nastiest area of all, below the rear passenger door at the join of the rear wing. The metal was so rotten that it flaked away in my hand and left huge holes. I carefully cut out some wire mesh to bridge the holes on the rear side of the panel, and smeared David's Isopon P40 fibreglass filler on the underside of the mesh to hold it in place and provide a backing. Also visible in the above photo is a big hole on the floor area inside the door. This was a result of years of water entering around the boot seams and running down the length of the boot floor before collecting at this spot. The rot went all the way through the floor, so I again plugged it with fibreglass filler as an initial layer. All these sections were then prepared for top layers of regular filler. This was after a meticulous procedure of washing, applying rust remover gel, wire brushing and so on, often several times.
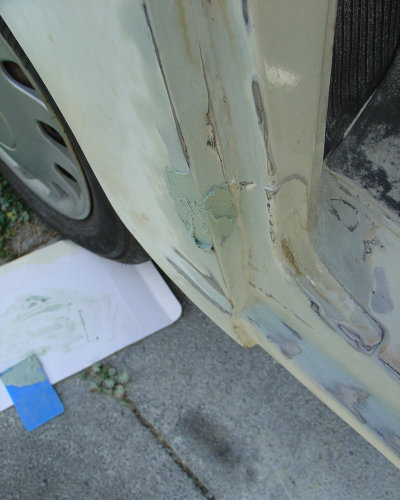
Several days of back-breaking work had got me this far, because although not visible from these first few pictures, the total area treated was considerable, and being mainly toward the underside of the car it meant laying on a cushion working upwards whilst sanding and performing other tasks. My back was so bad after each day that I could not stand up straight and I could barely walk. These sorts of jobs are best performed with the car on ramps and the area to be tackled at somewhere between waist and shoulder height. Sanding each section was the most time-consuming and energy-sapping duty of all, perhaps due to my quest for perfection following the standards I'd learnt during my classic car restoration course in Manchester several years earlier. The above image shows a final splodge of filler being applied to one area that was not quite flat after the previous layers had been sanded.
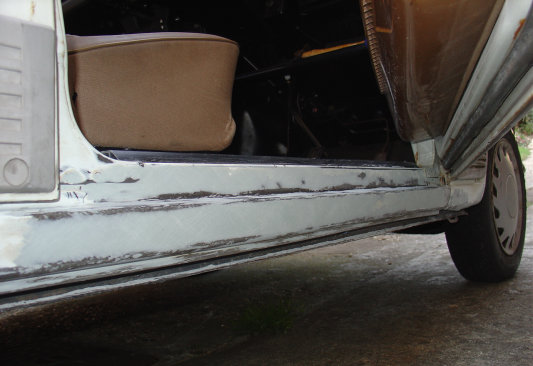
The work covered the full sill outer section, including the bottom lip underneath, plus most of the outer door frame sections above them. So much of this was rotten before that there was no point taking half measures, only to uncover more rust just months down the line, so I took it all back to bare metal. This meant applying filler to the entire lot so that I could sand it all back to a smooth finish.
The picture below also shows the nicely tidied up section underneath the rear quarter window, repaired by Derek as mentioned previously. Contrast this with images taken in recent years of the driver's side, where an ugly patch of rot could clearly be seen developing.
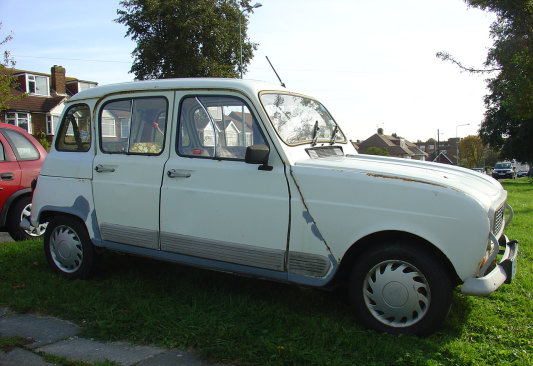
So, after these many sequences of slog, I slapped on a layer of grey primer using a brush, in order to provide the car with adequate - if temporary - protection. Application of a final top coat was not something I was in any rush to perform, since various other areas of bad bodywork exist around the car, and I would prefer to consider a complete respray once all these other areas are touched up, should I be able to find the time. Indeed, I was in something of a rush to get all this work finished before the colder, darker days of autumn fell, and the wet and windy weather began to take its hold on the car whilst it sat exposed for another winter.
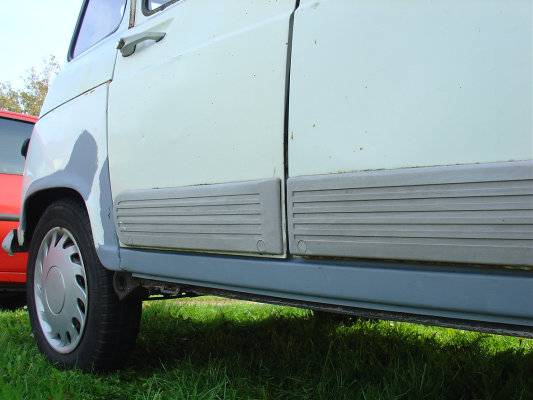
Looking at the above image, therefore, it might seem like pretty much everything is done according to my plan, but you'd be wrong. I hadn't counted on the sad ranks of the nation's tedious curtain-twitchers foiling my plans and hard work. Just like many years ago, when damage was caused to my previous R4, Nicolexia, by a Salford City Council worker whilst I was in the process of restoring her bodywork, I now encountered another humbling example of local services twittery. This time, I had my car parked in the Hanover district of Brighton, where I often left it for the day whilst working in the town. When I returned, I found a notice on my windscreen from the county fire service, stating that they had cleaned the road due to leaking fuel from my car. The notice unhelpfully advised:
- not 'parking the car on a steep camber', which it wasn't - the road was completely flat; and
- not 'overfilling the petrol tank', which I hadn't - it was only two thirds' full.
Coincidentally, or not, some rotten old bore appeared at his door behind me confirming the arrival of the fire brigade earlier in the day. The streets in this area have terraced houses fronting directly onto the road, and residents often get narked at whoever decides to park in front of their window, due to the lack of spaces available and the need for them sometimes to park several streets away. They get particularly annoyed when people like me park there for the day and go off to work in the town. We're outsiders and don't belong in their community, and we callously steal their parking spaces because the area represents the last part of central Brighton where it's still possible to park for free. Middle-England gits like this man are particularly enraged when they look outside their window and see a jumbled up piece of individualism staring back at them only two feet from their living room.
The zealous twonk indicated that the fire officers had lifted my car during the operation to counter terrorism, or should I say, to wipe the road with a little bit of rag. I enquired as to whether they had coincidentally been passing, and he stated, 'they were called', which clearly meant that he had called them. I could tell from his whole demeanour that this was an issue that bothered him, and there could have been nobody else both meek and bored enough to have done it. If I'd been aware at that moment of the full consequences of his actions, I'd have had difficulty refraining from punching his stupid, self-righteous, smug face in until it had a generally concave profile.
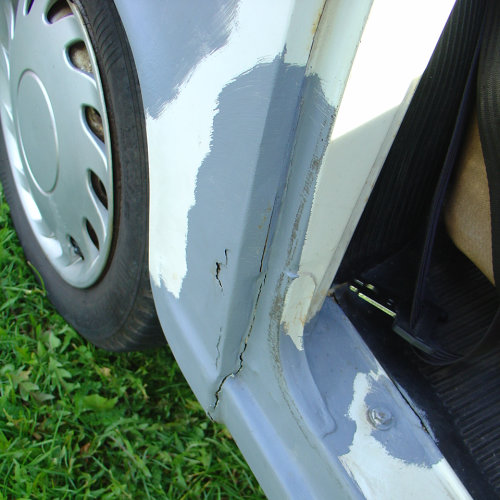
Looking at the above photo, the obvious damage doesn't necessarily seem that terrible, and that was the somewhat annoying reaction of some persons I showed it to, but the enormous amount of work and toil I had put into repairing it in the first instance now felt wasted, and I was furious. Whilst moving my car to wash the road for the benefit of Mr Community Safety Spokesperson, the fire officers had attempted to lift it using the very rear wing that I had just repaired, resulting in it cracking and breaking, as displayed. This was evident from the grubby fingerprints that were visible on the edges of the panel. I cannot believe such cretinous actions could have been performed by a responsible organisation. It could have been any area of my car that was damaged in the incident, but for it to be the exact part I had just spent so long seeing to felt like a great slap in the face.
I sent some photos to Derek at Renospeed to gauge his opinion on the damage, and whilst it is true that I had incorrectly filled the bottom section of the join between the sill section and the rear wing (these two areas should be separated by a gap), there can be no disputing the cause of the damage given the fingerprints on the panel, the knowledge of the car being lifted, and the fact that I confirmed the area as undamaged on the morning of that day, due to my still being in the post-repair zone of contentment which required me to marvel at my work every time I walked past the car.
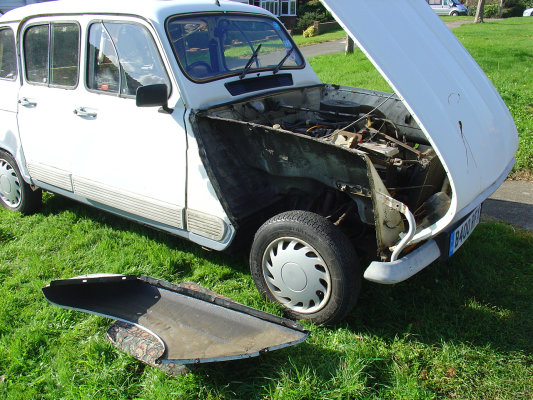
I had also been in a hurry to get the repairs done due to my forthcoming visit to France with the car, in October 2008. The work replacing the front wing was put on hold until I returned, because I have come to learn over the years that even the most simple Renault 4 jobs never go quite as planned, and one or more annoying things always cause what should be easy tasks to take several times longer than expected. This turned out to be exactly the case when I set about replacing the wing after returning from Rouen in France.
Removal of the wing was hampered by the most common cause of consternation that I consistently encounter when attempting repairs, that of rusty nuts and bolts. All but the last two bolts were off, but the remaining pair absolutely refused to budge and were in the most awkward locations: down the bottom of the A-frame section requiring me to jack the car up to (somewhat dangerously) get my arm and spanner in between the wheel and the wing; and at the bottom corner join with the inner wing / bonnet. Having been advised that the replacement should take around an hour, I had now already spent a full afternoon just getting the damned thing off, and due to the new reduced winter sunlight hours, I was forced to concede for the day.
The next morning, I set about fitting the new wing, seen laying on the ground in the above image, only to discover that despite being a standard and uniform R4 part, I may as well have attempted to fit a wing from a Ford Fiesta, a Datsun Cherry or a Boeing 747, since all would have been equally ill-fitting as this thing. If I tried to line up the top holes or those along the join of the A-frame, the ones at the front would be nowhere near, and vice-versa. The lower front bolt was particularly troublesome and disturbingly out of line, whilst the front flange for affixing to the inner wing was a good inch away from where it should be, and not straight or consistent down its length. I attempted to remedy this slightly by bending it with a pair of pliers inside a cloth, but it didn't help much. The most impossible part of all was the metal piece often referred to as the 'lug-handle'. The curved grey front bumper rod is also bolted to the outer wing in two places, but it seemed I had no chance of getting these bolts lined up.
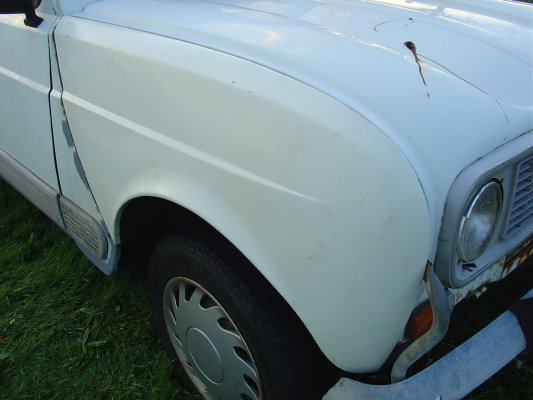
Eventually, as the sun was beginning to set on a second day of tedious toil, and after much hammering, twisting, heaving and cursing, I managed to get the blasted part in place, though it still didn't look entirely straight. The knowledge of how much stress was probably being exerted on certain areas of the panel in order to hold it in place was not going to make me feel so comfortable in driving the car in future. I have imaginations that at some point there'll be a big bang as the forces on the panel cause it to shatter. The above picture clearly shows the mis-match in height between the wing and the A-frame section behind it, most visible on the groove running at mid-height along the full length of the car. Whether this is the result of the new wing being manufactured slightly askew, or the previous one being slowly bent into a contorted shape by the forces of the car running during several years, I cannot be sure. It seems unlikely that the part would be duff, so I can only assume the latter explanation.
So, 2008 has been another fairly costly year in keeping the R4 alive, though in many senses I don't see it as particularly expensive compared to the sums most people spend on their cars' lifetimes these days. Aside from the initial outlay for a vehicle, many modern cars have mechanical systems that prevent repairs by persons not having the right equipment or specialist knowledge, and increasingly these fittings and the warranties that accompany the cars mean only main dealer servicing is a possibility. It's not uncommon for replacement of standard parts of some cars to now result in a four-figure bill, for such things as a new clutch. In addition, most of these cars are on the scrap heap before their age reaches double figures. Considering my Renault 4's twenty-four-year age and its almost absolute reliability, the sums I find myself forking out for its maintenance each year are still favourable compared to most alternatives.
 home |
 articles |
